



Before reading !
This documentation will explain step by step how to generate a website with HzMycelium, but !!!
▒ Yes there is a lot of text :( I'm sorry, I try to keep it short but I like explaining things in details. It's long but for the good reasons, everything is detailed so the tool can be easier to understand and use, so yeah it takes a few more lines.
▒ Here, the goal is to help any artist from the very start, including those with a zero base knowledge of all the technical stuff.
All these steps can be scary or discouraging if it's your first time doing something like this, but I swear it's easier and quicker than you think.
▒ All of this page is also available as a video tutorial on YouTube, for those who find it easier to follow ! I also give some more tips and tricks in this video, so it might be useful to check. It is recorded in french, but english subtitles are available (I could re-record it in english if several people contact me about it, but not planned atm).
▒ I'm working on Windows, which means the images illustrating the explanations will be too, but I'll let you know when the steps are different on Mac (if you're on Linux you're already used to searching answers for your problems lol)

Setting up Python
If you already know how to create a virtual environment and installer the requirements.txt, you can download the zip file on Codeberg and go directly to the HzM showcase !
With HzM, we'll mainly work from the terminal. I know the interface is stiff, it's scary at first and it works differently than regular folder/files management. But you'll see that with some explanations, you'll get accustomed really quickly and there's nothing too complicated for what we need to do.
Maybe someday I'll get motivated to make a real interface but buttons, text fields etc, but for know I know nothing about it.
▓ Downloading the script from Codeberg
You can just go on the project's Codeberg page, click on the three little dots on the right above the file list, and choose « Download ZIP ».
You will only need to interact with the template folder « Artist », but just for your knowledge, here's what's in the zip :
▒ the python files forming the script (main, build, buildpage, utils etc)
▒ the requirements.txt file who lists the librairies to install in order to work correctly
▒ the « Templates » folder in which there are the templates for the visual aspect of the site
▒ the previously mentionned « Artist » folder in which you'll be working
▓ Installing Python
Then, we'll have to install Python on your computer. The easiest way to do it is from the official website, by clicking on the latest version (which should be suggested by default).
Once the installer is downloaded and executed, we'll just check that Python is indeed detected by your computer.
After opening the terminal (preferably Windows Powershell which should be installed by default), you can simply enter the command « python --version », and the version that you just downloaded should be displayed.
 If everything's okay, you can go to the next step !
If the terminal returned and error, you might need to tell your computer where to look for Python. You'll need to add a system environment varibale, more precisely in the Path.
It's terrifying when written like that, but following the steps of this tutorial everythign should be good (here it is for Mac).
Once the terminal has access to Python, go next !
▓ Creating a virtual environment
The name of the folder doesn't matter, but little tip : when you're working with this kind of tool, it's better to keep your file names as « clean » as possible. No caps, no accents nor special characters, and spaces are repaced by dashes (- or _).
Example : « I spent 10 hours on the mix !.mp3 » becomes « i_spent_10_hours_on_the_mix.mp3 ».
Here, the script makes sure to clean up the file names so it doesn't break, but keep in mind that it's a good habit to take, just in case.
This is done by entering « cd » + the path to your folder.
cd path/to/my/folder
 You can see that the adress at which the commands execute has changed and now displays the name of your folder, which indicates that we are now working in it. Well right know the image shows it's on my desktop, it's not the best. On Windows you can copy the path by right clicking on the top bar, useful when you have a long path in a hard drive for example.
To run the generator, the Python script needs to access several external librairies that you'll need to install (the requirements.txt file we will see a bit later).
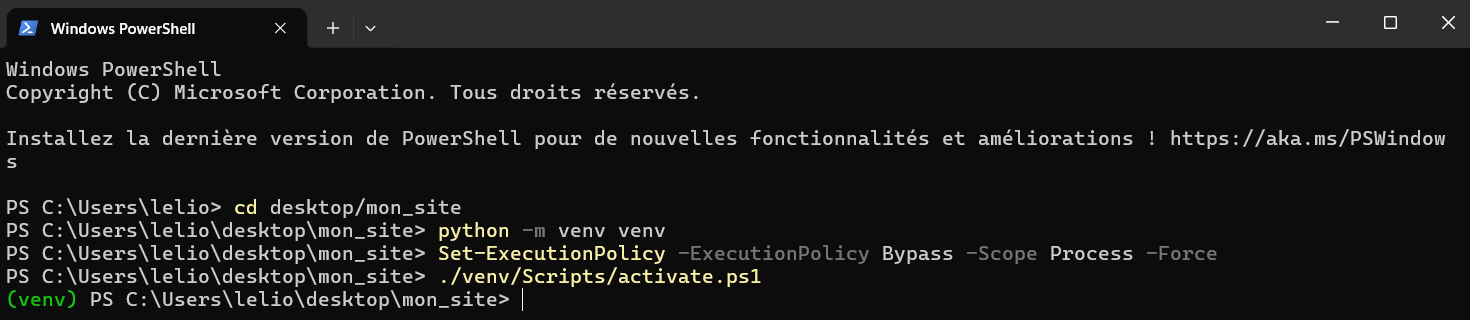
To avoid these librairies to install themselves in some obscure place of your computer, you'll create a folder : the virtual environment (venv for short), that will store these librairies. To create it, enter this command in the terminal, that is basically the same everywhere :
▓ Activate the virtual environment
Now you'll need to activate it so you can work in its context.
You can do it with this command on Windows :
▓ Installing the required libraries (requirements)
The list in the requirements.txt file shows the version that the scripts need for every library.
Luckily, Python has a tool, Pip, that allows us to install al of these by running a single command instead of one by one :
The installation should finish without problem, but if you want to check if everything is okay, you can run this small command to display the list of what has been installed, and compare it with the requirements.txt.
pip list
Using HzMycelium (finally)
▓ Organising files and folders (audios, images...)
In the zip that you downloaded earlier, there was a folder named « Artist » : this is the one that will be used by the script by default. It already contains a template tree structure that will show you the way to go to organise your files :
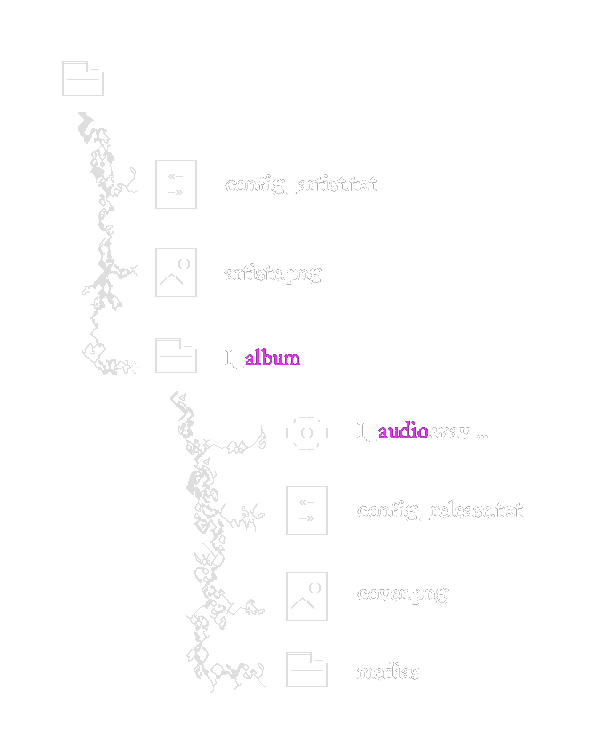 On the base level of the folders structure, entering the main folder, you'll find :
 ▒ the config_artist file for the front page (we'll talk about that right after)
▒ the artist's photo that will be used for the front page
▒ a folder for each release (album, ep, or even single if you want)
Entering a release folder, you'll find :
▒ all of the audio files for you tracks
▒ the config_release file for this release's page
▒ the image file for the cover
▒ the « medias » folder in which are stored the images that will display while a song is playing. The names of the image files don't matter. If you don't want any image to display during a song, leave that folder empty !
For the releases folders and the track files, this number + underscore at the beginning of the name determines their order (on the front page, and in the tracklist).
It works similarly for the covers and the artist's photo : the white part in the name is detected by the script. It will use any image file whose name starts with « cover » as, well, a cover.
For the configs and the media folders even if the name doesn't matter, there's really no need to change it (but you do you).
Here's an example of a tree structure on Windows :
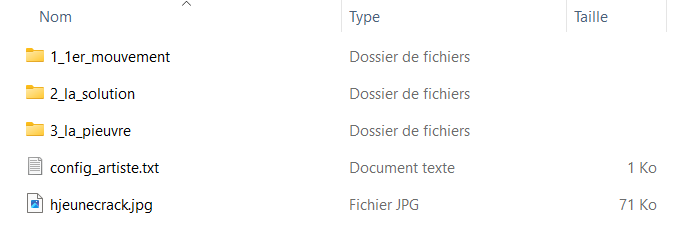 Main artist folder
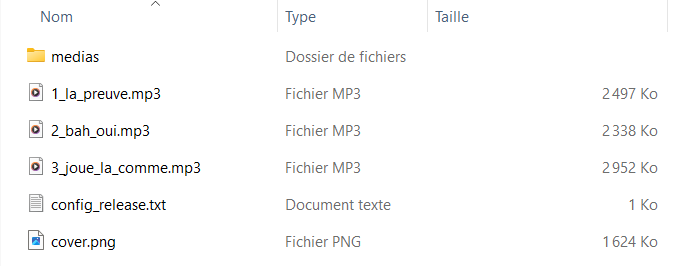 Inside the release folder « 3_la_pieuvre »
 ▓ Showcase of the templates
▒ a front page with the artist's presentation, a release list, links to the artist's social medias...
▒ one page per release with the tracks, an audio player, and images displaying randomly while a track is playing
Choosing a template defines the GENERAL aspect of your site : two different release cannot use a template each.
(it could be made possible if too much people are frustrated by that choice, but it would make things more complex, technically and also regarding the graphic coherence of the whole site.)
Here are the three templates, with some examples of usage :▒ Hyphe :
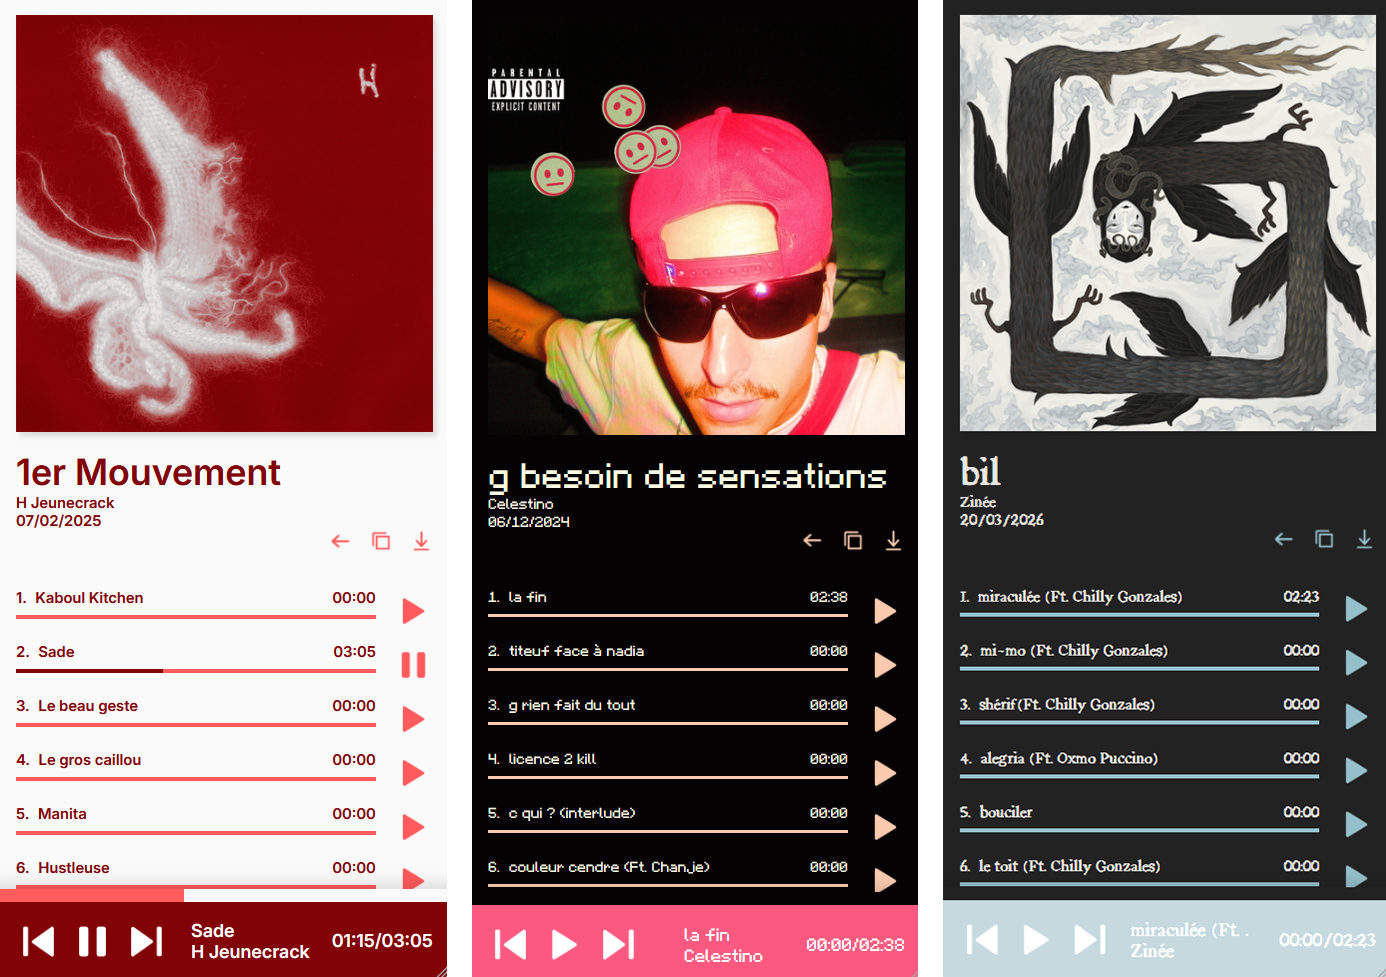 The simplest template, with an interface resembling that of the plateforms.
 When playing a song, the images are displayed in a long scroll at the bottom of the page, position and size are random.
If you don't want any images to be displayed when playing a track, this is probably the template that would work the best for this case !
Example of a website generated with the Hyphe template here !
▒ Spore :
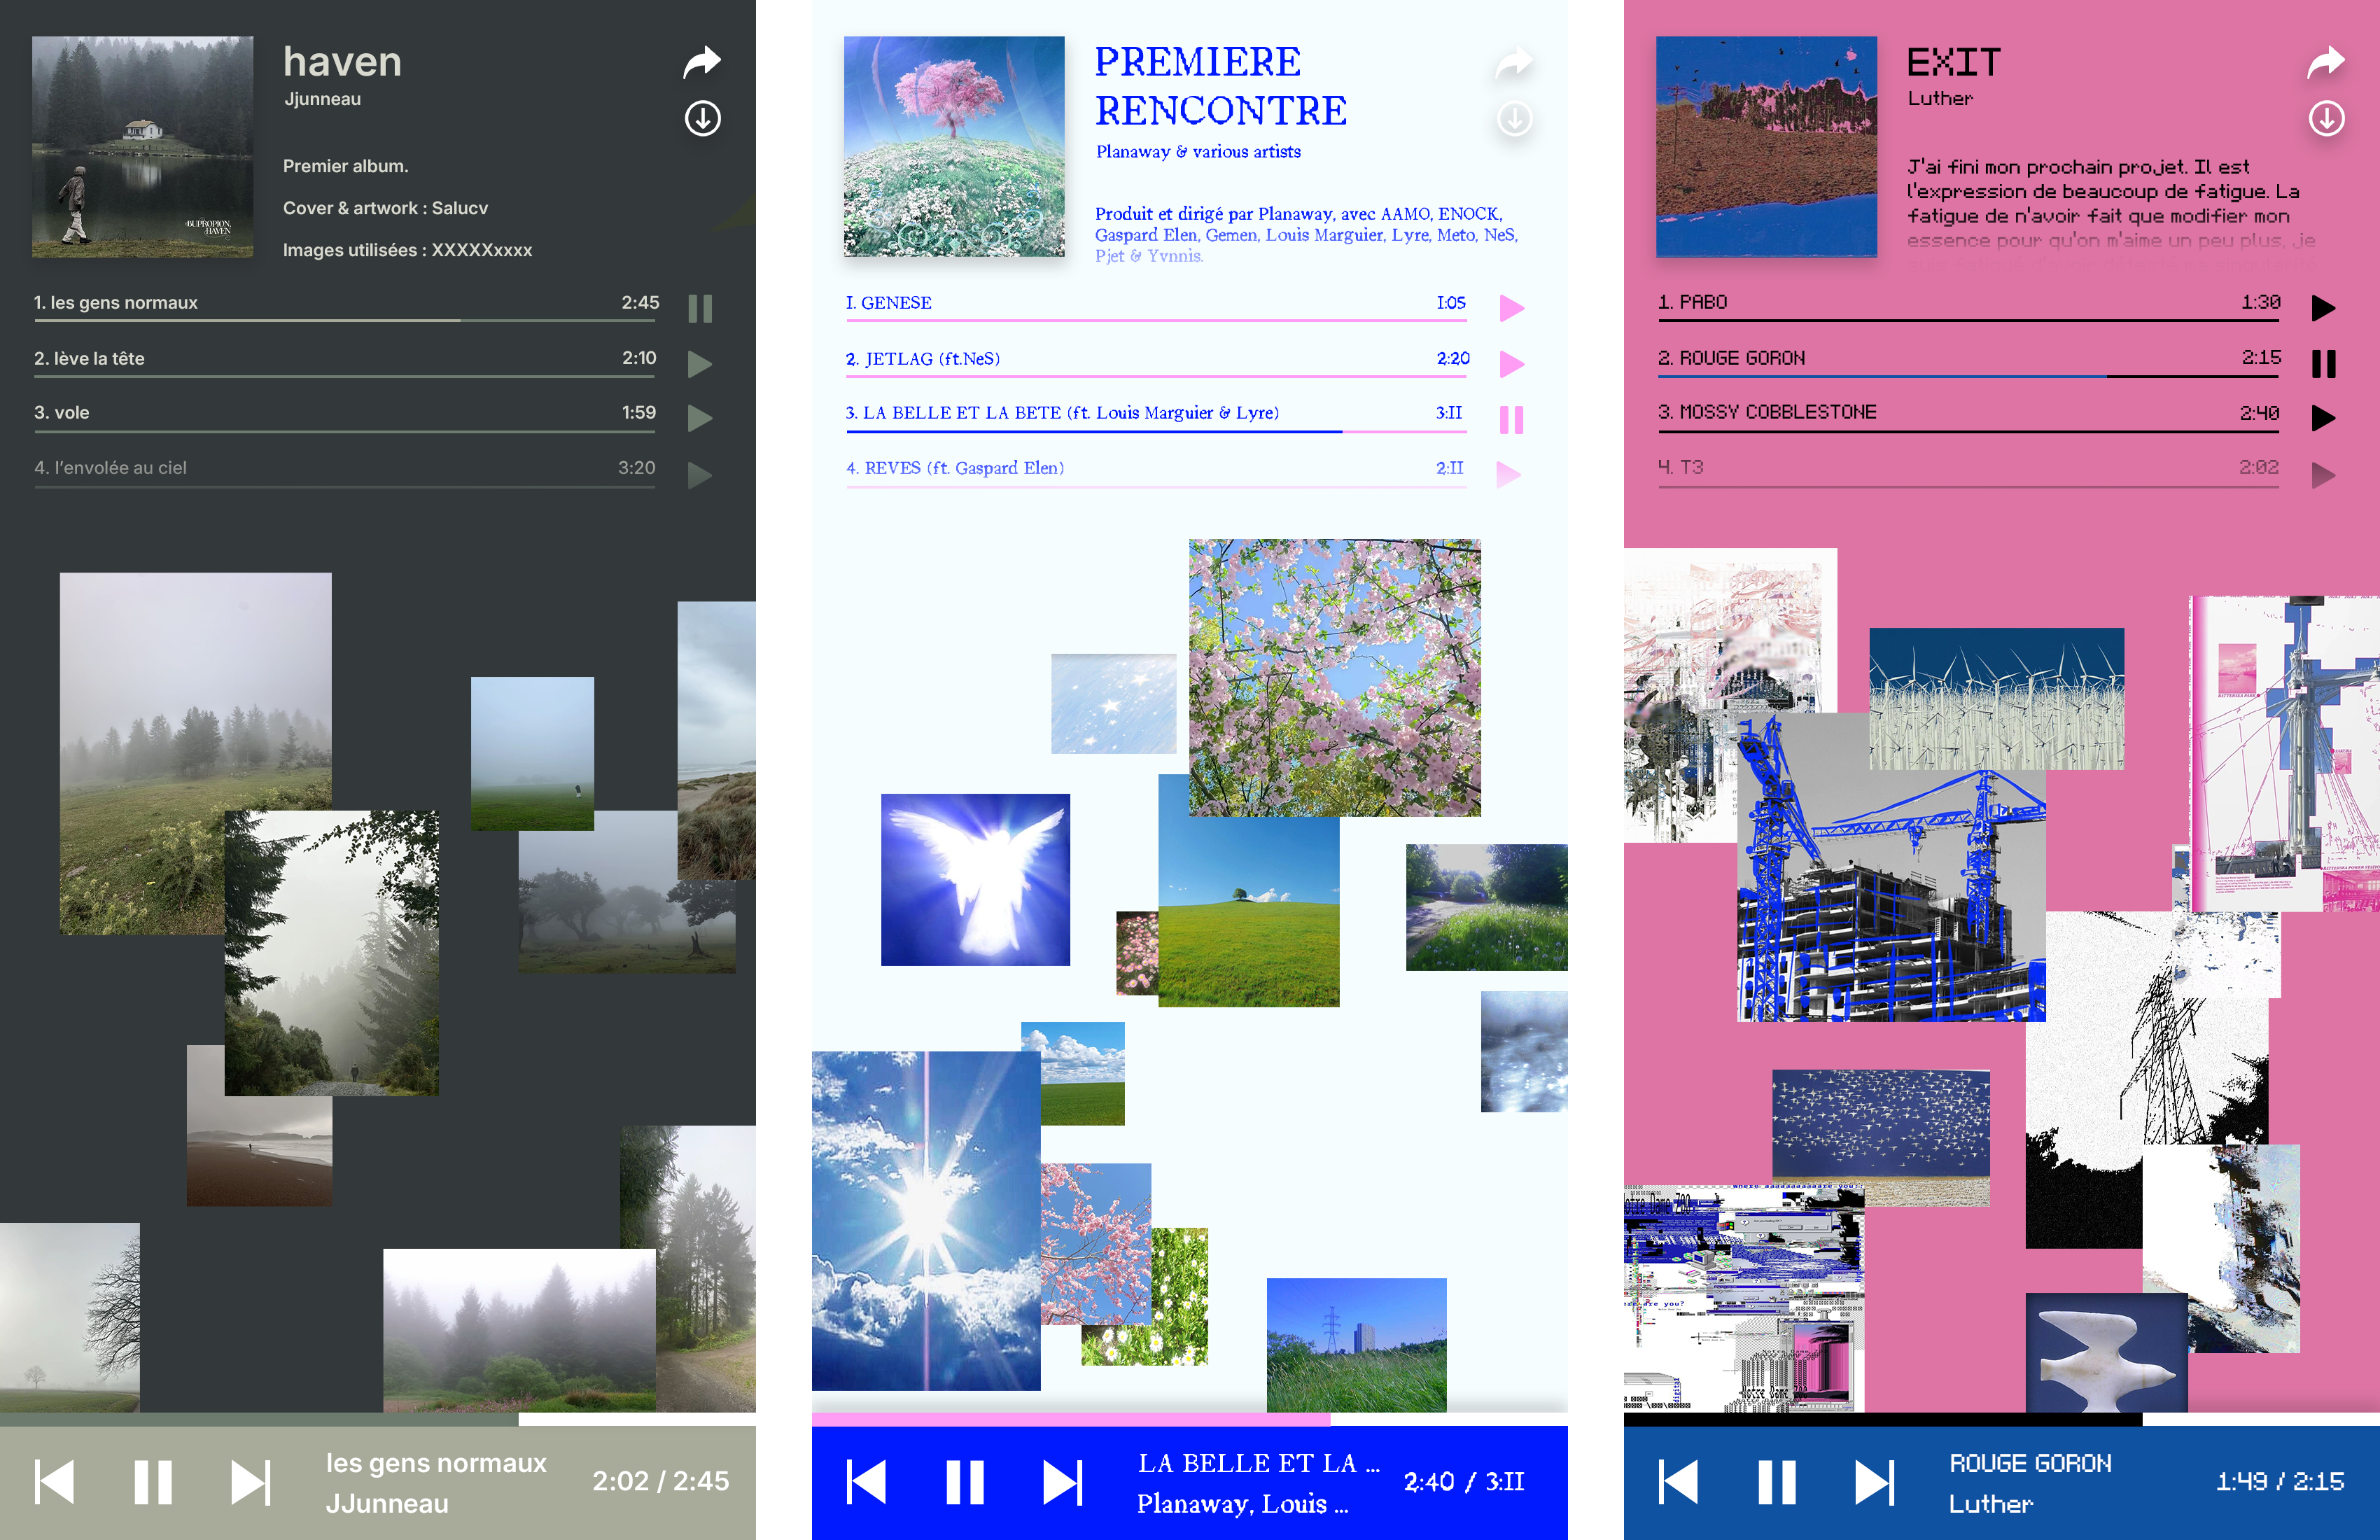 The template where the listening interface is the most discreet to leave the maximum space for the images.
They're placed in a cloud in which you can move in 3D and zoom. This is perfect if you want to emphasize the link between your songs and the images.
The template where the listening interface is the most discreet to leave the maximum space for the images.
They're placed in a cloud in which you can move in 3D and zoom. This is perfect if you want to emphasize the link between your songs and the images. Example of a website generated with the Spore templatehere !
▒ Psilo :
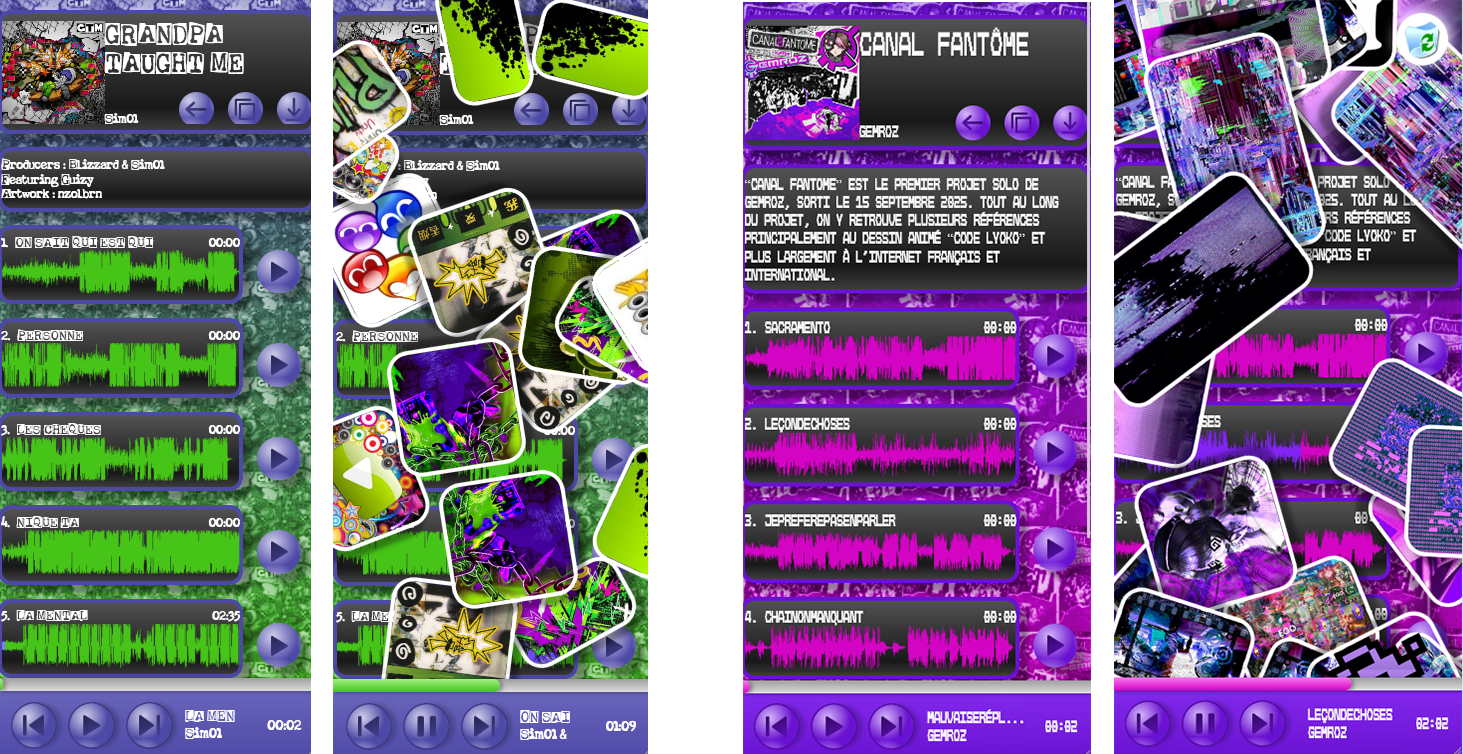 Template inspired by the blogs et personal sites of the early web. A bit more difficult to use, il will not be suited to everybody, but it works well with the underground aesthetics that really blow your ears and eyes away.
 While playing a song, the images pile up on the screen until the interface is covered up. Position, and rotation are random. With transparent images (png format), it gives off a really cool sticker effect !
Example of a website generated with the Psilo templatehere !
▓ Fonts
(again this could be made possible, this time being way easier code-wise, but I don't think this would be a good idea regarding the visual side).
There are five fonts to choose from (for nom ?) :
Wondertype
A serif with nice details for the titles (like on this page), but which also stays legible at a smaller size for the text.
Inter Semibold
All-purpose Sans serif, so simple but as much effective and legible, impossible to go wrong with this one. The Regular version is currently used by this site :)
GNF
Pixel font imitating Minecraft's one, to pair with the underground scene's digital universes !
La Machine Company
Use with caution, pair it with STRONG and expressive visual identities.
MBA Mono Sice
For those who thought that the GNF was too well-behaved, this font pushes it up a notch. Beware as it only has caps !
▓ Color palette
Wether it be for the front page or for a release page, a color palette always works the same. There are four parameters to fill in, one for each color, but we'll see this technical part later. For now we just want to know what they determine.
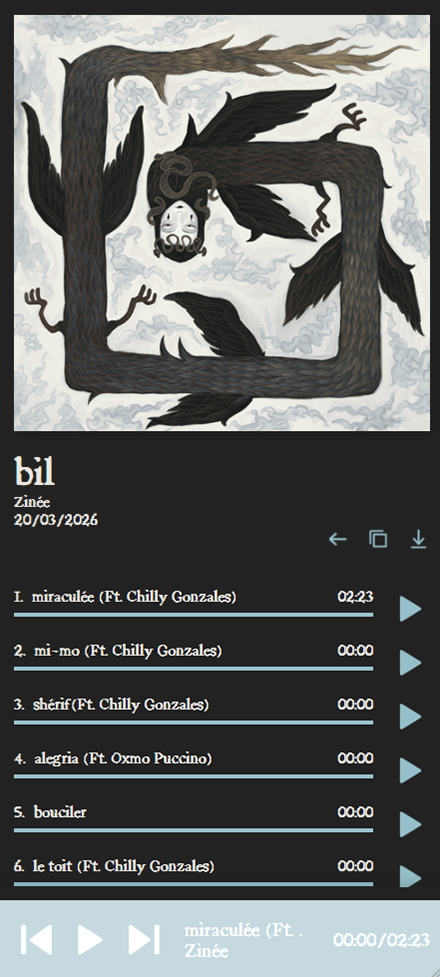
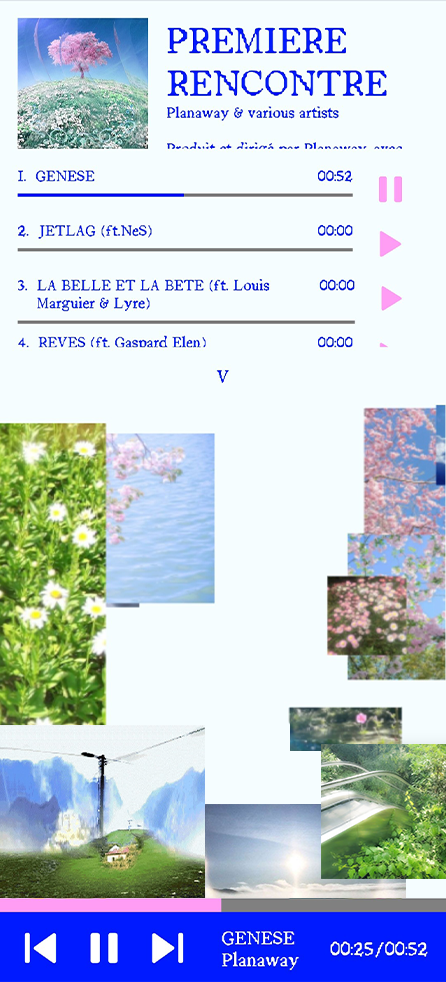

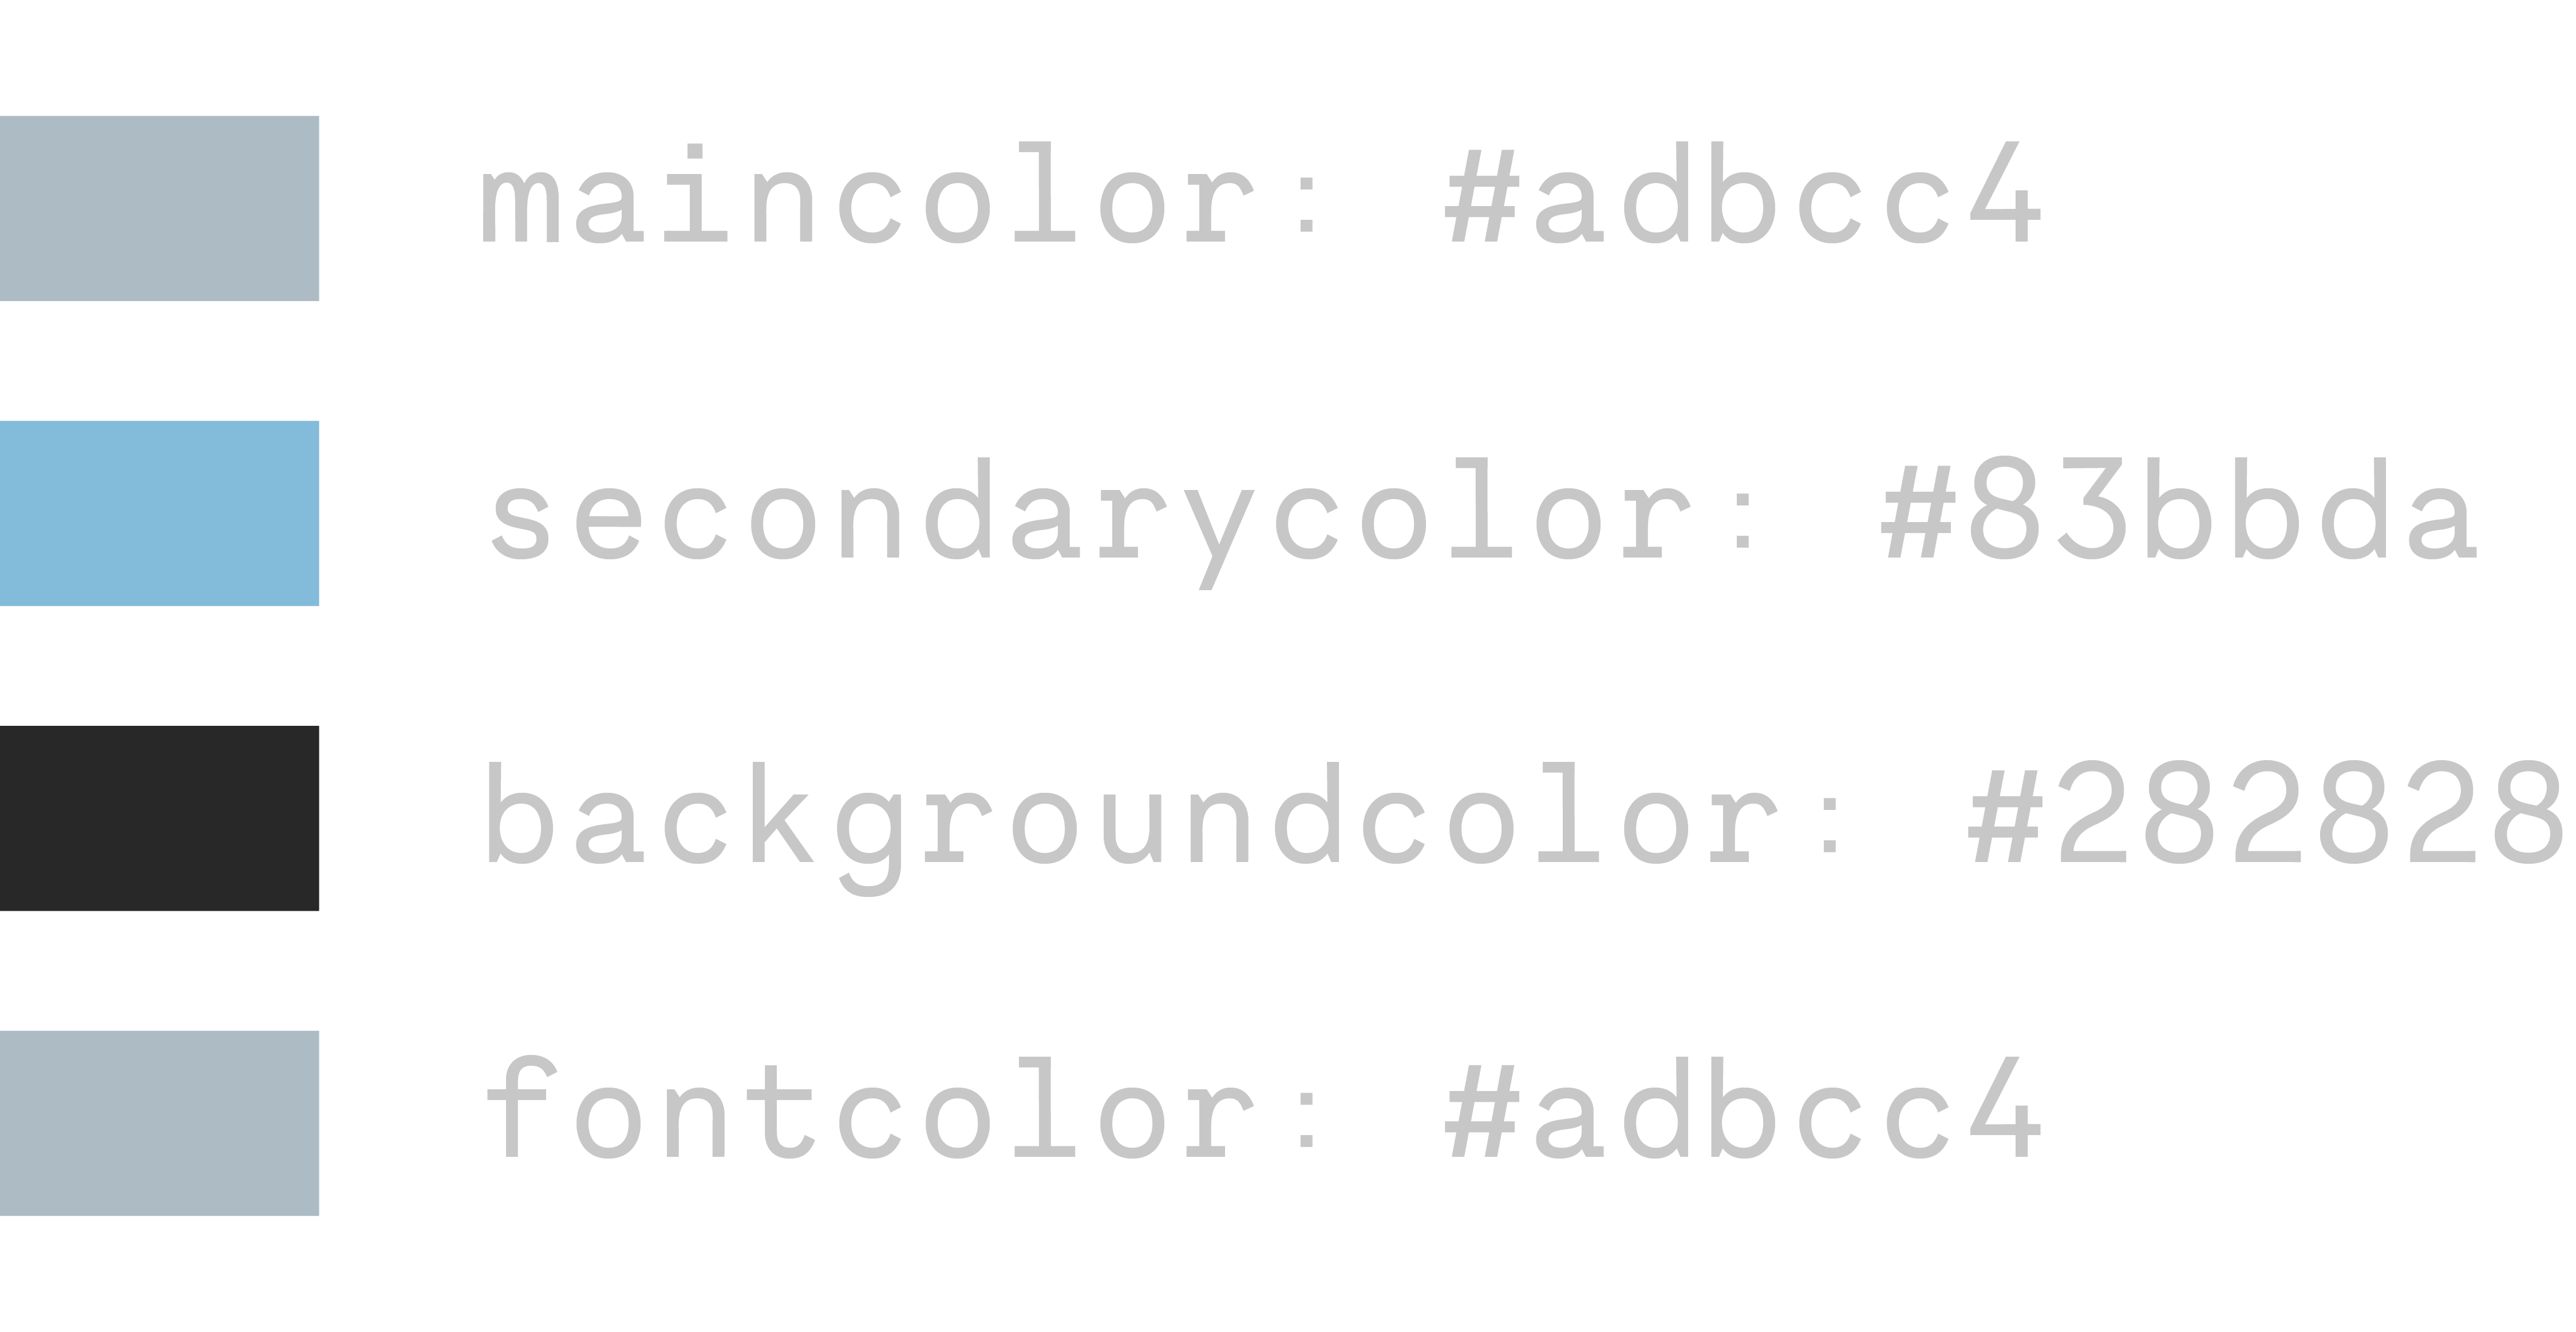
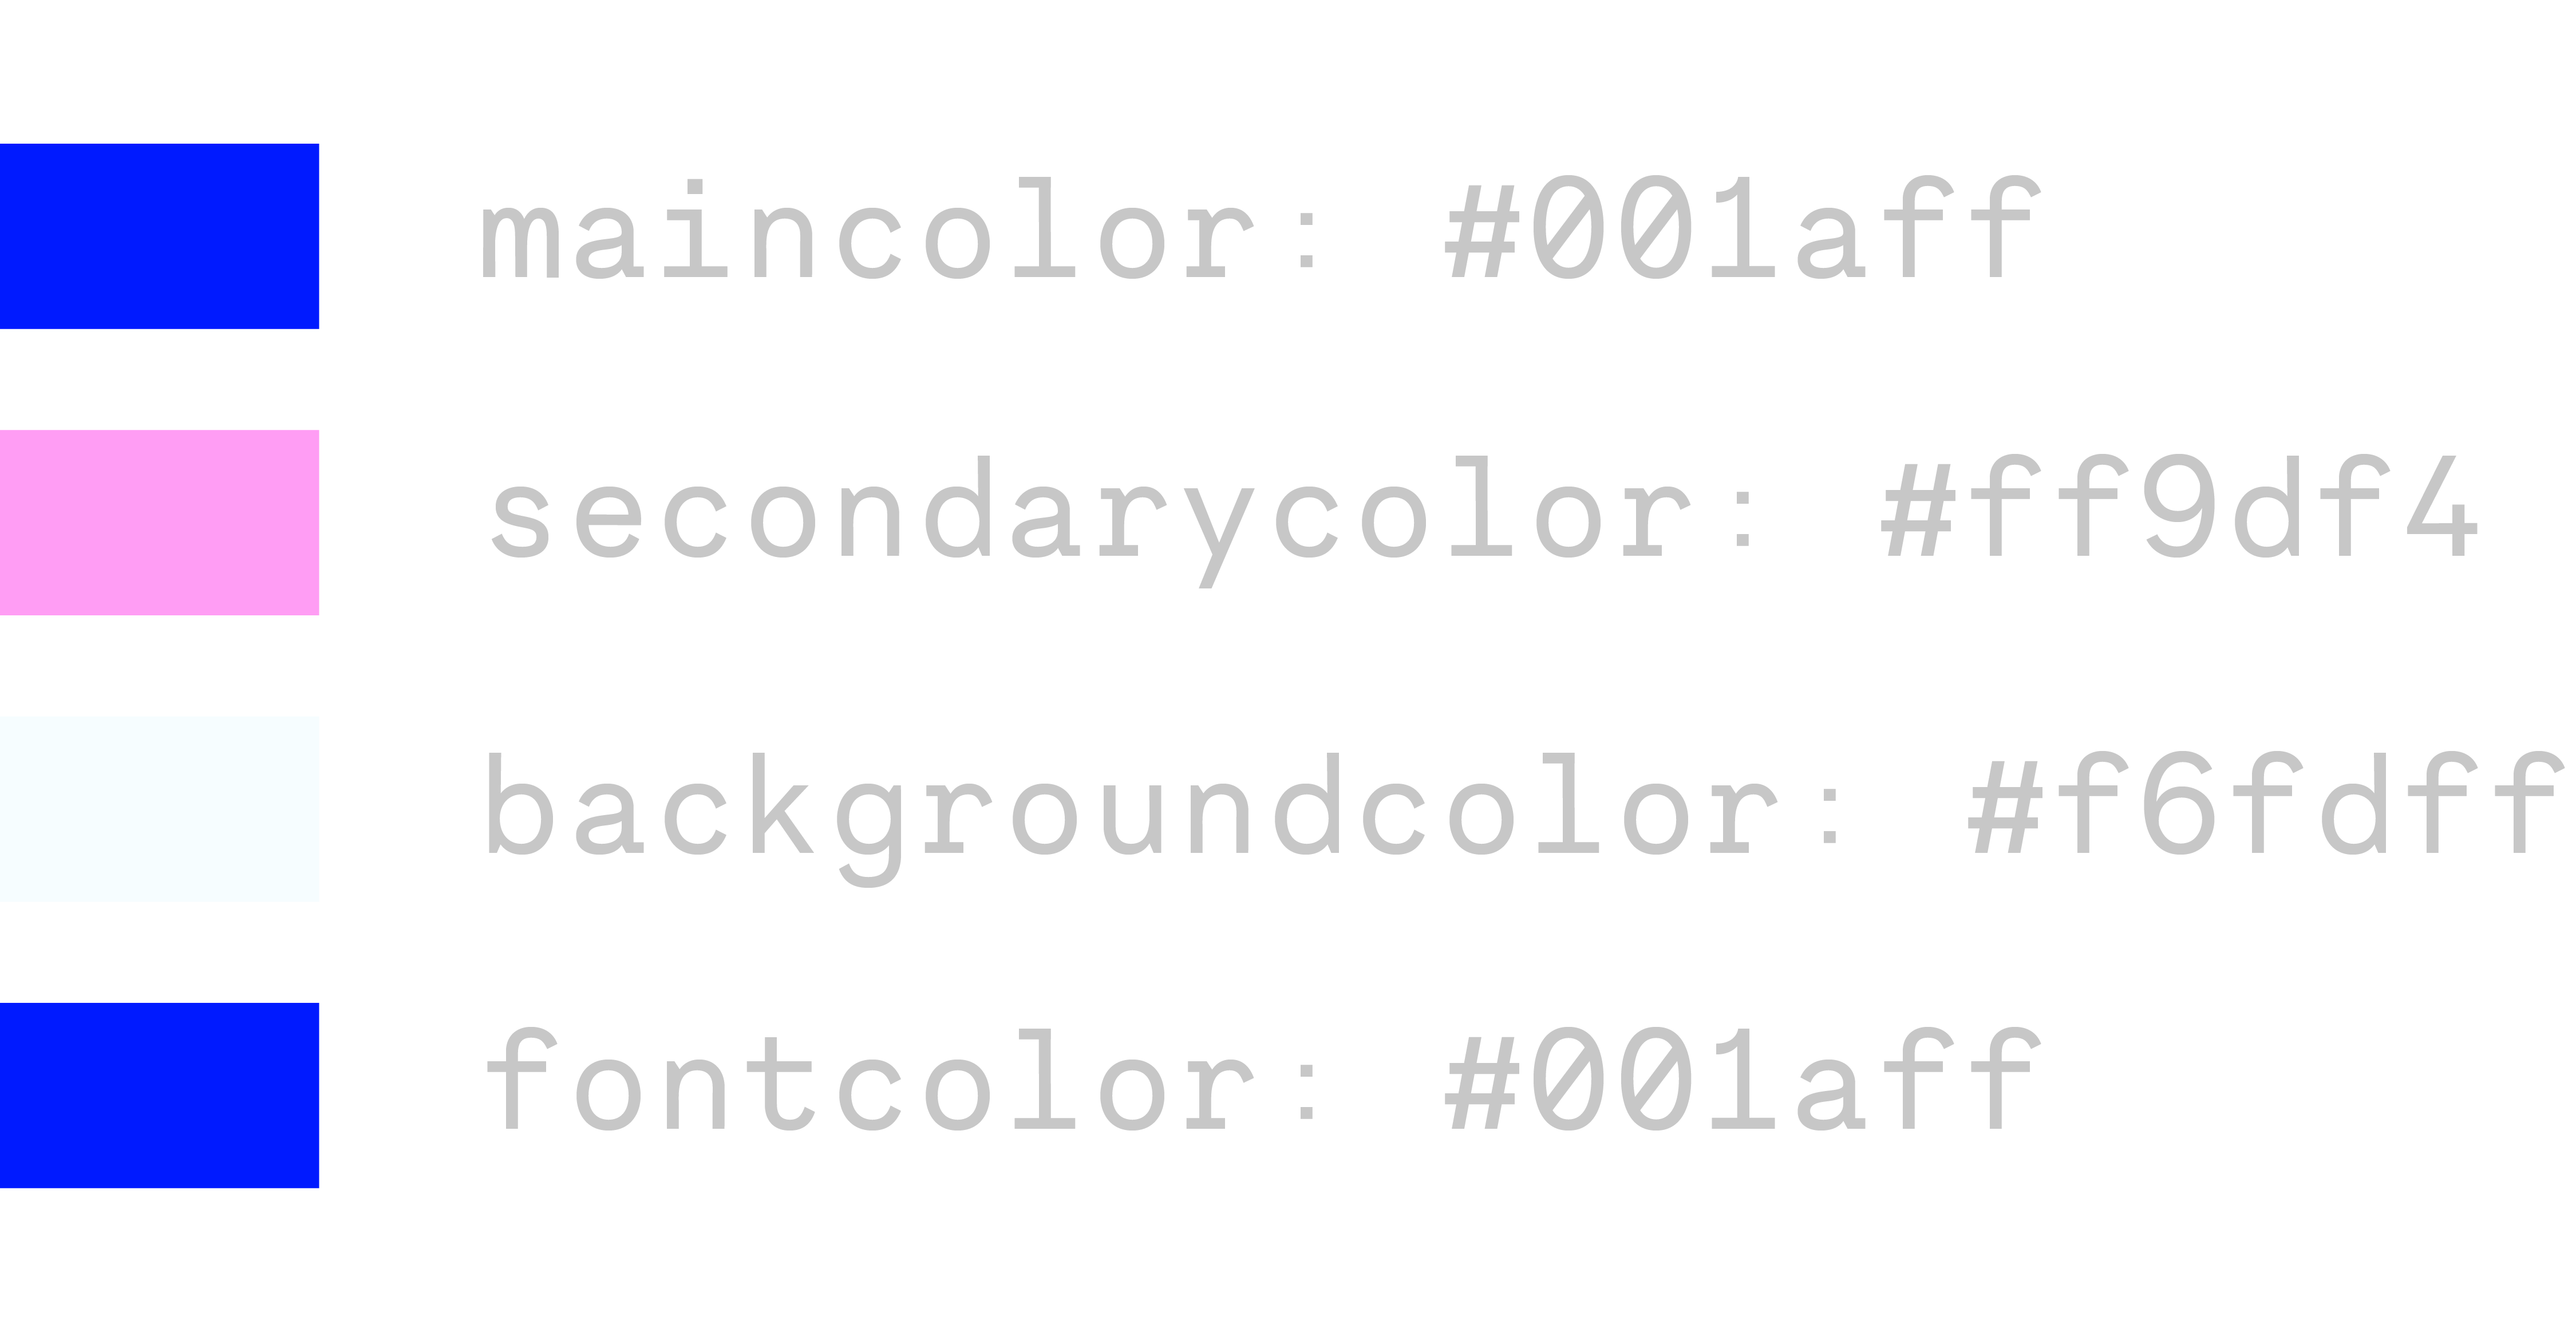
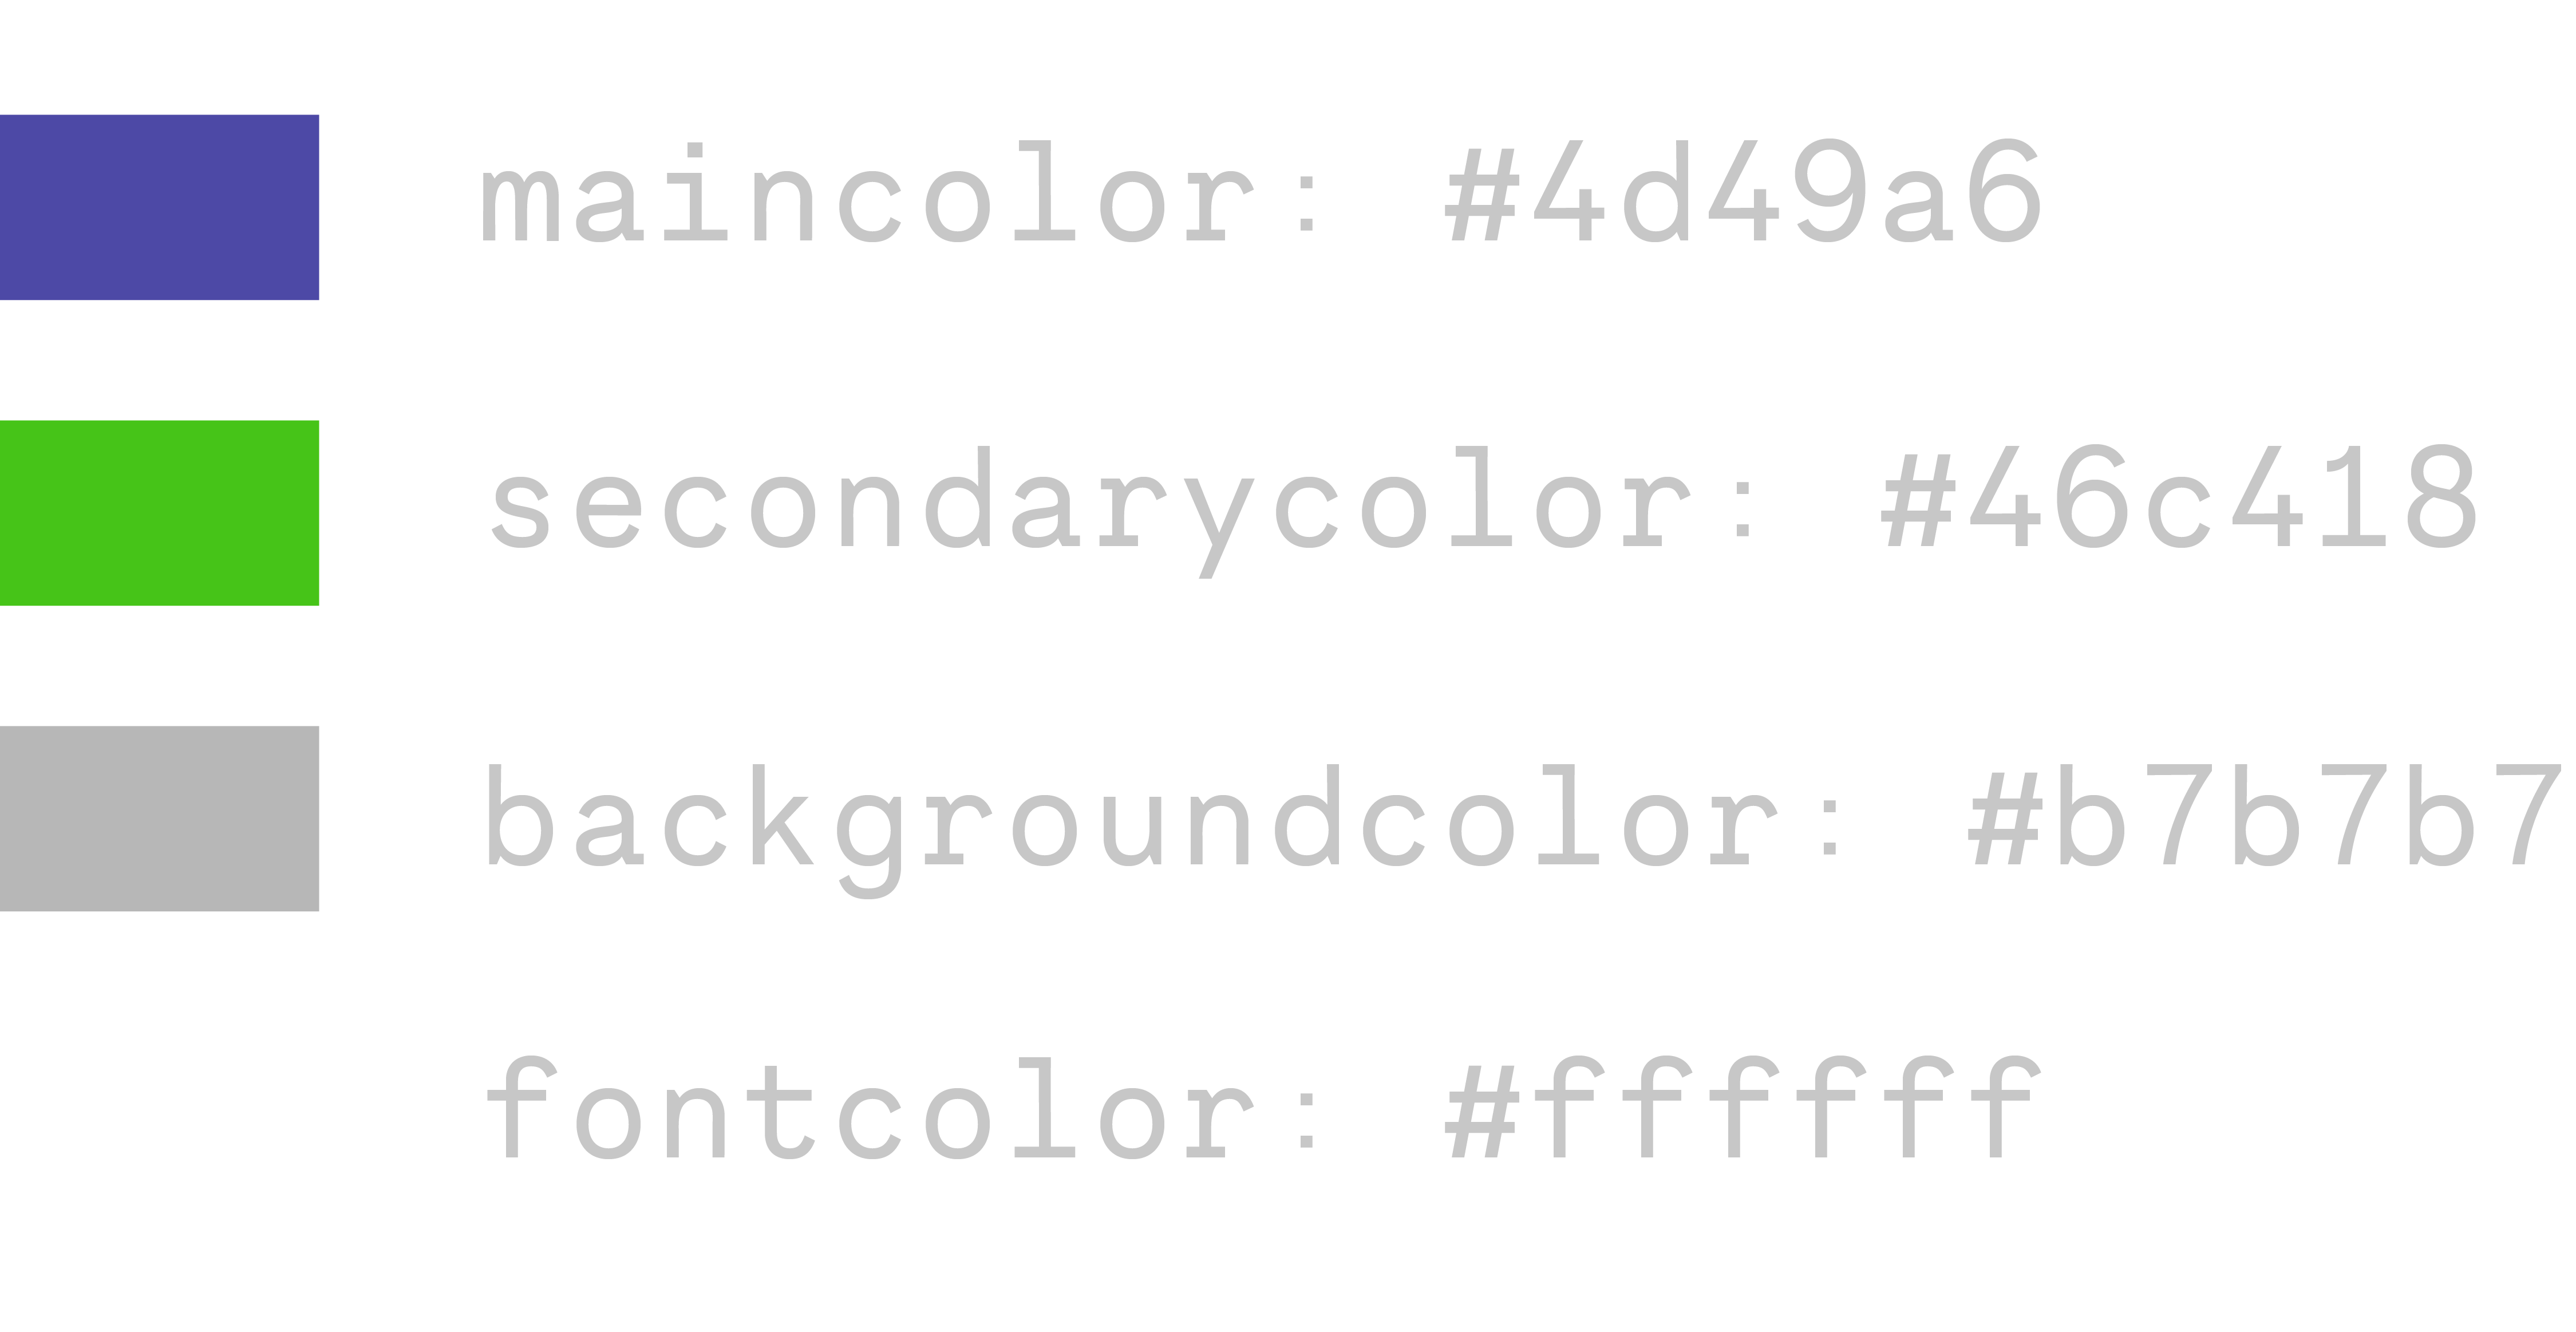
▒ the main color
On all the templates, it determines the color of the bottom song player (even if it's its only use, it gives the whole page its tone, hence the « main »). On Psilo, it's also used for a lot of details of the interface like the box's borders, the play/pause buttons, and the front page links.
▒ the secondary color
It's used for details of the interface. The progression bar while a song is playing, links to other websites... It's often used either to contrast, or to complement the main color.
▒ the background color
The name says it all, it's just the page's background.
▒ the font color
The name also says it all. In a lot of palettes, the font color doesn't really count as a color : you'll see it's often more efficient (and more suiting) to put it the same as the main color, or sometimes just put it in black or white to contrast it with the background.
HzM doesn't have any limitations on the colors you can choose,so it could be difficult for you to make up a both pretty and legible palette.
The easiest way is often to take inspiration from you cover. With a tool like a color picker, choose the three/four main colors and try out the different associations between them : which one would be the main, the secondary....
Of course, make sure to always keep a nice contrast between your background color and your font color for legibility. You can use a really strong background color (bright red for example) as long as the font color is duller in comparison (black or dark red, even white if it works). On the other hand, if you want a flashy colored font (neon green, neon blue...), try to keep a dark background color.
▓ Writing the config files
To really understand how it works, config files consists of two parts : the keys and the values.
A key is the part before the colon, it defines the information that we're about to give. For a release, we need the album's title, the artists participating, the release date etc. Those are the keys already written in the config files of the zip.
All you need to do is write the informations about your release after the colons : these are the values of the keys. Then obviously save the text file so the modifications are taken into consideration
release_title: I spent 10 hours on the mix !
release_date: 13/12/2026
Don't pressure yourself if everything is not perfect while filling in the files ! You can do some tests, then run the script to generate the site again as much as you need. Start by filling in a first draft of the configs, then see how it looks and modify it bit by bit.
▒ Filing in the artist config
We'll start by the bigger piece, it's the bigger of the two types of config files. It has a lot of parameters (with a few optional ones). Good news, as this config file is only used for the front page, you'll only need to fill it in once !Values to fill in :
▒ artist's name
artist: XXXXXX
▒ artist's description
The descriptions are a bit special. You can write directly in the config file if it's not too long and complicated. You just need to be careful with the indents after a line break (4 spaces).
For example, this won't work :
artist_description: |
XXXXXX XX XX XXXXXXX XXX XX XX XXXXX X
XXX XX XXXXXXX XX XXXXXX X
XXXXX XX XX
artist_description: |
XXXXXX XX XX XXXXXXX XXX XX XX XXXXX X
XXX XX XXXXXXX XX XXXXXX X
XXXXX XX XX
After doing some testing and writing a few lines, I figured it was really annoying to do, so I made up an alternative solution.
Still in the release folder, you'll be able to create an other .txt file (from the notebook) whose name starts with « description » (same principle as for « cover » and « artist »).
If there is a file named « description » in your folder, the script will replace the value of « artist_description » by its content, so you can leave it empty !
And in this file you can write as much as you want without worrying about the indent. You can skip lines, add text formatting (bold, italic...) and even links in you description ! If you're interested I talk about this more deeply in Some cool tips to avoid writing too much here.
▒ links to social medias.
Here, you'll be able to add as many links as you want. The syntax is a bit different because this is a dictionnary, « links » that will store keys and values that you determine. The names of the keys you'll write will be displayed on your front page.
If you add another key,
links:
Spotify: https://XXXXXXX
Deezer: https://XXXXXXX
YouTube: https://XXXXXXX
My other super cool website: https://XXXXXXX
etc
▒ links to other supporting plateforms
As your tracks on this website are free to listen to and download, you might want to indicate some places where your listeners can support you. In the same way as with the other links, you can just add as many keys as you want !
tips_links:
Tipeee: https://XXXXXXX
Patreon: https://XXXXXXX
Buy me a coffee: https://XXXXXXX
etc
▒ links to other artists' pages
At the bottom of each front page, no matter the template, there's a « Check them out too ! ». This is a place to connect artists that have their own personal site between each other (whether it is generated by HzM or not). If you know someone that has a cool site, or whose music you like a lot, you can put their link here.
Writing these values is a bit more complex : there's a main dictionnary (friend_links) that contains other dictionnaries (the names of your friends). This sounds convoluted, but in reality you just need to add a level of indent (so 4 + 4 spaces = 8), and if you need you can just copy-paste the existing ones below.
Each link can have its own description, make your visitors want to check out these other artists !
I might be planning to add an image in addition to the description, that could be nice. Coming soon ???
friend_links:
friend 1:
friend_link: https://XXXXXXX
friend_description: XXX XXXX XXX
friend 2:
friend_link: https://XXXXXXX
friend_description: XXX XXXX XXX
etc
▒ template choice. The caps don't matter.
template: Hyphe
ortemplate: Spore
ortemplate: Psilo
▒ folice choice. I shortened the names of some fonts so they're easier to write and to avoid spelling mistakes. The caps don't matter.
font: Wondertype
orfont: Inter
orfont: GNF
orfont: LaMachine
orfont: MBA
▒ main color
main_color: "#ffffff"
▒ secondary color
second_color: "#ffffff"
▒ background color
background_color: "#ffffff"
▒ font color
font_color: "#ffffff"
If you're lost on what those 4 keys are, you need to read the color palette part.
The colors are written in hex code,
Alrightttt so these are all the parameters for the artist config ! The release configs work really similarly, with a few differencies.
▒ Fill in a config release
For each release page, you'll need to fill in the matching file.▒ artist name (or artists)
release_artist: XXXXXX(, XXXX)
▒ release title
release_title: XXXXXX
▒ release date. The mm/dd/year format isn't mandatory, it's still plain text so you can write anything in it, like « somewhere, sometime, last summer » !
release_date: XX/XX/XXXX
▒ release description. Tell a story, credit the people who worked on it and the sources of your images, give some more details on the tracks...
Same as for the artist config, you can use an extern « description_XXX.txt » file if you need.
release_description: XXXXXX
▒ tracks
Here, it's very similar to the links in the artist config, but instead of a dictionnary, you'll be filling a list to add the tracks in the order of your tracklist.
I know everything is already written in the files' names and that it's not really convenient to write them here again, but it allows the use of accents and special characters in the song titles !
If we wanted to determine the order of the songs from this list, we would have to check if the titles of the audio files correspond to the elements of this list, meaning no margin of error regarding spelling mistakes. That would be hellish, if anyone has a better solution, contact me :)
release_tracks:
- XXXXXX
- XXXXXX
- XXXXXX
etc
▒ main color
The color palette here works exactly the same as in the artist config !
main_color: "#ffffff"
▒ secondary color
second_color: "#ffffff"
▒ background color
background_color: "#ffffff"
▒ font color
font_color: "#ffffff"
▓ Writing the command to run the script
All of the set up we did earlier with the terminal and Python will be useful here. With the venv still activated, you can run this command.
Keep in mind all of the arguments with a dash before (like « -af artist » and « -of site ») are optional. You don't necessarily have to write them in your command, you can read more about it below.
▒ « python » is because we are calling a Python command.
▒ « main.py » is the name of the main file to activate. It will then call all of the other files (build.py, buildpage.py, utils.py etc) but you don't need to worry about those.
▒ « -af artist » or « -artistfolder artist » determines the folder in which you've organised your files earlier.
It is set as « artist » by default, like in the downloaded zip template. If you didn't change the name, you can even skip this part while writing the command, it's shorter.
This argument can be useful if you want two different artist folders, and being able to chose from which one to generate a site.
▒ « -of site » or « -outputfolder site » determines the name of the folder that will be created by the script.
It is set as « site » by default, so no need to write this argument if it suits you.
Again this argument can be useful if you want to generate two different sites (let's say to compare or keep a trace of previous versions for example), because otherwise each new generated site with the same name will overwrite the previous one.
▒ « build » is an instruction to precise the type of operation that you want to execute, here building the site.
For now this is the only argument of this type, but this could change some day so I decided to keep it here.
If you don't need any of the optional arguments, you can just write it that way !Nothing important about this list, it's just here as a way to gather all of the infos at the same place, so that you can verify if everything is right.
AWESOME !!! The site is generated !
▓ Open, verify, modify the generated site
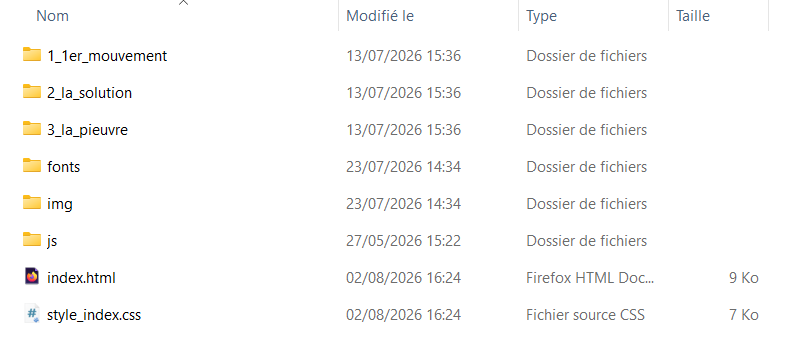 Some really quick context : a web page is roughly two main files : the .html that contains all of the text information, and the .css that contains everything that stylizes the page. You can see in the created folders that the front page and each release page all have their own .html page and the .css style file that goes with it.
 By double clicking a .html file, you can open it in your browser. This is the easiest and quickest way to check a file like this, and it gives an overview of what the page looks like.
This is a good start, but you'll see some stuff displaying weirdly, or straight up not displaying, especially on the releases pages. This is because in order to fonction correctly, some functionnalities need to be in a simulated web hosting environment (I'm not a pro, this explanation might be very off).
Good news, you can do that super quickly with Python. Open a new terminal window, and like earlier, move into your working folder. But this time, you'll go a layer deeper : in the folder that was just created.
 Once you're in there, you can run this command that starts a local server :
 Most of the time, the adress looks like something like this :
That was for visualising the newly generated site (takes some extra steps but you'll get used to it). If you want to do any modifications, you can just reorganise you folders/files, rewrite stuff in the config files, and run the script again so that the modifications are taken into consideration !
If you want to modify your site more in depth by changing things that are not provided in the config files or the templates (like the texts in the front page's menus), it is possible, but it is one tiny step above technically, you should read this where I explain it more in detail.
▓ Hosting the site
▓ Some cool tips to try out while customising your site
▒ Pretty much every image file that you will be using can be replaced by gifs. This allows animated album covers, or even animated artist « profile pictures » for example.
Sadly it's not possible to display gifs in the images cloud on Spore... It's because of ThreeJS's sprites that only work with still images. This could be possible with videos, I'm planning to work on it, but not sure this would be worth it considering the size of the files that would imply.
▒ Most of the infos written in the config files are just plain text. I gave the example for the release date : you don't have to keep it in a mm/dd/year format, you can be vague, original, and even use this field for something entirely different, like the recording/brainstorming place...▒ The descriptions (artists and releases) can be written in Markdown, whether it is in the config file, or in the separate description file.
If you don't know about Markdown, it's a really simple language that allows super quick text formatting by adding characters to the text. One star for *italic* text, two for **bold** text. Titles with different hierarchies with the hashtags (# title1, ## title2, ### title3, etc). And more importantly, clickable links ! You just need to put the text to display between brackets, and right after the URL between parenthesis, [like this](https://crazy-good-website).
I know this is a lot of informations to take in, but it's really useful and quick to lean and use. It is also implemented in most text editing/writing/notetaking softwares !
▒ Originally, the « Check them out too ! » section was made tolink together artists with their own websites (generated with HzM or not). This creates a sort of network on the same principle as webrings (there are already plenty of webrings for musicians like this one.)
In practice, you can use that field for whatever you want, and put any link to an other internet website. You can make a moodboard of this section for example, with something like « Things that inspire me », or « My favorite albums », as you want !
▒ On Hyphe and Spore, you can use an image as a banner for the front page, just to add a little more detail. You just need to put the image in the same folder as your artist photo (root level, without entering any release folder) and rename so its name starts with « banner » !
▒ On Psilo, if you use images with transparency (.png) in your media folder, the script detects them and removes the white border, giving some sort of sticker effect that looks pretty cool.
▒ On Psilo, the images piling up can be grabbed and moved around on the page. Juste because it's fun. Only on computer though (for now).
I give some other tips in the video tutorial, it's more convenient for this kind of advice and it helps reduce the amount of writing, take a look !
Some questions you might have
▓ I don't have any images to put in my media folder, where can I find some ?
There are a lot of sites that provide public domain images, this will not suit to everybody, but it's always worth to check out :
▒ Museum of Chicago : be careful to search for « public domain ».
▒ Library of the Congress of Washington : great catalogue, sorted into interesting categories
▒ French National Library. Be careful to check the public domaine (« libre de droit ») in the search bar, just in case.
/!\ I don't really recommand Pinterest for several reasons. Yes the recommandation algorithm works really well and gives you a ton of similar images, it's tempting to make yourself a huge and nice folder in 5 minutes.
However this is kind of risky because the origin of the images and their authors are very rarely attributed. Using these without checking is problematic at worst and not nice at best.
Then, I find that recommended images tend to repeat themselves, losing their originality, maybe because the algorithm is TOO efficient. I find it much more interesting to gather yourself images that you like over the course of days, weeks, months, without having them being handled to you by an algorithm.
▓ Why are my songs available to download ??? / why isn't there no payment system or shop ???
These are choices I made to stay in that independant ecosystem and community, where art, songs, tools etc spread freely. We're on the Internet, everything can be shared, reused, and is accessible freely one way or another (even if a person, or more likely a corporation wants to prevent you from accessing some files, there will always be a way to access them).
Anyway, if you public your songs on YoutubeMusic (offered by Distrokid), everyone can download them thanks to a basic YouTube to mp3 converter, so we might as well simplify things from the beggining :)
Take advantage of it and start remixing, making playlists, tapes, burn CDs !!!
▓ I want to modify something on my site that's not intended in the templates :(
Good news, it's possible ! You'll just have to dive deeper into the machinery by tweaking the HTML and CSS files.
If you already know about working with web sites, it's great : you'll just have to work on the generated folder (« site ») like on any other web project.
If you panicked reading HTML and CSS, it's going to take a bit more time, but don't worry. These are really easy to learn languages, with thousands of tutorials and forums made for absolute begginers.
You can start by downloading a coding software like VS Codium to go through the files and understand their structure.
I quickly go over the base notions in the video tutorial, that would be too long to write here but it's already a good start that will allow you to modify quite some stuff !
▓ I found a bug / I want to do something that doesn't work or that's not intended
That was bound to happen ! As I am not a developper, there are a lot of scenarios and ways to use the tool that I didn't think about. In either of these cases, contact me by one of the links at the bottom of the page.
If the answer to your problem isn't in this documentation, I'll try to answer and help.
If it's a bug, I would be glad if you can report it to me so I can correct it !
If it's a feature that doesn't exist, this might be something beneficial for everybody and I could start working on it (see the roadmap!)

Tool & site realised, coded, designed (and translated lol) by hand and brain by Lélio :)
Support me here if you want : Buy me a coffee !
Contact me here for any question/request/remark etc :
insta : @lelioimphra
mail : contact@leliowww.xyz